


| Apps | About us | Contact |
|
|

|
|
![]() Manage your Boats, Planes, Motorized Machines, Consumption, Maintenance and Logbook
Manage your Boats, Planes, Motorized Machines, Consumption, Maintenance and Logbook
Designed for anybody owning one or more motors (boats, planes, agricultural machinery, etc.), the Boat Manager application allows you to monitor, in detail, fuel consumption in hours or miles, expenditure, maintenance and basically everything related to them.
The app also enables you to create and manage:
|
![]() The integrated logbook allows you to easily record your travel information thanks to the geolocation functionalities of your iPhone or iPad.
The integrated logbook allows you to easily record your travel information thanks to the geolocation functionalities of your iPhone or iPad.
A carbon footprint can also be calculated depending on the motor’s consumption, enabling you to know the mass of carbon dioxide (CO2) it produces in total and on average per day and per mile/time traveled. You can easily export all the data you input (fill-ups and expenses) from your iPhone/iPad as a CSV file (usable in Excel or any other spreadsheet program), thus allowing you to perform your own statistical calculations. |
|
![]() * Freemium version, limited to 4 fill-ups and 4 cost lines per motor. Integrated purchase unlocks unlimited features. *
* Freemium version, limited to 4 fill-ups and 4 cost lines per motor. Integrated purchase unlocks unlimited features. *
Universal application for iPhone/iPad, iOS 5.0 and above.
Optimized for Retina Display.
Help & FAQ
![]() Is the application free of charge?
Is the application free of charge?
Downloading the application from the App Store is free, but you will only be able to create 4 fill-ups, 4 expenses, etc. per vehicle. This will allow you to try the application and see if it fits your needs.
When creating the 4th fill-up, you will be given the opportunity to make an In-App Purchase in order to remove this limit. If you decide to make this purchase, you will then be able to create as many fill-ups and cost lines as you wish.
![]() How can I become familiar with the application?
How can I become familiar with the application?
Installing the application will also create a sample boat with some fictitious but realistic data. You will then be able to browse all the views of the app, and alter these data as you wish. You will quickly learn how to use the application and its possibilities.
Once you no longer need this sample boat, you can, of course, delete it from the application.
![]() How can I restore an application I purchased?
How can I restore an application I purchased?
If you uninstall then reinstall the app, or if you install it on another device, the application won’t recognize your first in-app purchase.
To unlock it again, go to the app Settings view and perform one of the following actions:
- tap on the “Buy Full Version” / “Buy Now” buttons
- if displayed, hit the “Restore in-app purchase” button
Important note: make sure that your device is connected to the iTunes account you used for the first in-app purchase.
Your in-app purchase will be restored, and you won't be charged again.
You can restore your in-app purchase on up to 5 different iOS devices, using the same iTunes account. For more information about in-app purchases, visit:
https://support.apple.com/en-us/HT204530
![]() Possible errors when making in-app purchases:
Possible errors when making in-app purchases:
Error messages: “In-app purchases are currently disabled.” or “There was an error purchasing this item, please try again.”
Check the following items:
-
in-app purchases are enabled (iOS Settings, General, Restrictions, In-app purchase)
-
your Internet connection is OK
-
you are properly connected to your iTunes account (iOS Settings, Store, Apple ID), and your credit card details are valid.
Error message: “This item is currently being modified”
Check the following items:
you are properly connected to your iTunes account (iOS Settings, Store, Apple ID), and your credit card details are valid.
if there seems to be nothing wrong with your iTunes account, contact the Apple Express Lane at:
http://www.apple.com/support/contact/
1) The Motors tab:
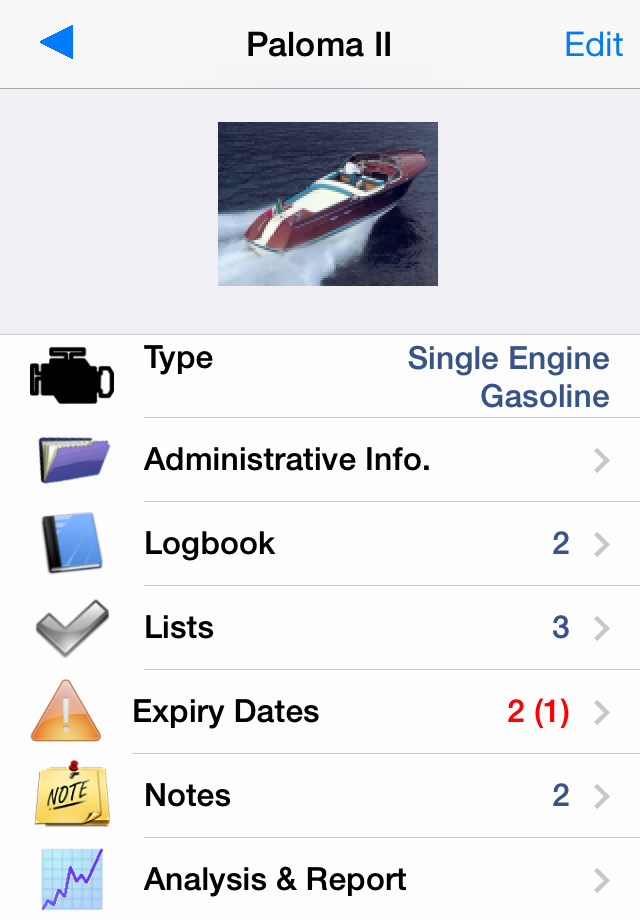
The application allows you to manage every motorized or motorless unit or device, such as boats (motorboats or sailboats), planes or any other kind of machine (agricultural machinery, generators, etc.). The Motors tab displays the list of vehicles entered in the application and allows you to retrieve their information.
![]() How can I add a vehicle?
How can I add a vehicle?
Select the vehicle list under the Motors tab. Hit the “+” button then enter the following information:
- name
- motorisation
- fuel
- consumption follow-up unit (time, mileage or both)
- odometer values (time or mileage) at last fill-up
Important note: if you’re creating a twin-engined vehicle which only has a single odometer, you are advised to select the “single-engined” motorization so you don’t have to enter the same value twice when inputting a fill-up.
Once the vehicle has been created, you can also enter the following data:
- administrative information (owner, registration, serial number, etc.)
- picture
- check lists (see following chapter for more info.)
- equipment list with expiry date (see following chapter for more info.)
- notes reflecting the vehicle's history
- log entries (trips, etc.)
![]() How can I delete a vehicle?
How can I delete a vehicle?
Select the vehicle list under the Motors tab. Hit the “Edit” button, then the red icon to the right of the line you want to delete.
A “Delete” button is then displayed on the right. Tap on this button to confirm the deletion. The vehicle is deleted, as well as all related data.
Note: this deletion method also applies to all list data in the application (fill-ups, expenses, planned actions, etc.).
![]() How can I modify a vehicle?
How can I modify a vehicle?
Select the vehicle list under the Motors tab. Hitting the “Edit” button will display its detailed information.
Tap on the line you wish to modify before making your changes.
To modify the odometer values (time and/or mileage) or the fuel volume unit (L or Gal), hit the “Edit” button at the top right of the screen, then select the line you want to modify.
To add a picture, simply tap on the “Edit” button at the top right of the screen, then hit the camera icon and choose whether to take a picture or use one retrieved from your library.
![]() How can I set the app currency?
How can I set the app currency?
Under the Settings tab, select the Settings button and then the “Currency” section.
You can select the currency used throughout the application there.
2) Fuel fill-ups:
![]() How can I add a fuel fill-up?
How can I add a fuel fill-up?
Important: fill-ups have to be entered in chronological order. Otherwise, the vehicle odometer value will not be updated automatically. If you wish to input the vehicle’s fill-up history, you have to do so before starting to enter its current fill-ups.
Select the vehicle in the main list and hit the “Fuel” label, or select the “Add fill-up” icon in the vehicle list.
The fill-up list is then displayed. Hit the “+” button. Input the amount and volume of the fill-up, as well as the current vehicle odometer value (mileage or time).
Note: It is important to enter the total mileage, not just the distance you have traveled since the last fill-up.
The application then calculates the distance or time you have traveled since the last fill-up, the fuel price and your mean consumption, which will help you check that the data you entered is correct. The fill-up list also enables you to modify or delete previously entered data (in case you made a mistake).
When you input a new fill-up, the current vehicle odometer value(s) is/are automatically updated with the value(s) you enter. You can nonetheless modify that parameter manually if you need to (if you forgot to register a fill-up, for example).
It is possible to enter partial or complete fill-ups. For partial fill-ups, simply activate the Partial Fill-up switch. The consumption will not be calculated for that fill-up, but will be cumulated with the next full fill-up instead.
![]() How can I manually modify the odometer values?
How can I manually modify the odometer values?
You input the odometer value (time or mileage) of a vehicle when you create it. It is then automatically updated every time you enter data about a tank refill.
You are able to manually modify this value if you need to (for example, if you made a mistake when first typing the mileage, or if you want to delete or recreate fill-ups, or if you lent your vehicle to someone else who filled it up), by following these steps:
- select the vehicle under the Motors tab
- hit the “Edit” button at the top right of the screen
- under the “Odometer(s)” section, select the odometer you want to modify and change its value
Please note that the value you enter will be used as former mileage when you input the next fill-up.
![]() How can I add the first fill-up of a brand new or used vehicle?
How can I add the first fill-up of a brand new or used vehicle?
This fill-up is a little bit special because the driven mileage or time taken will probably not be realistic (for example, a new boat bought with a current odometer value of 0 and completely filled up after 0.2 hours in use) and is thus not relevant for the consumption calculation.
We therefore advise you to not enter this fill-up into the application as is, but as an “Other type of expense” instead.
For example, you can create a category dedicated to the initial vehicle expenses: purchase price, first fill-up, registration fees, etc.
![]() How can I enter the fill-up history?
How can I enter the fill-up history?
You have two options for inputting your fill-up history into the application:
-
1) Manually:
- USA/UK CSV file: the decimal separator is a period/full stop and the value separator is a comma
- Non imperial countries CSV: the decimal separator is a comma and the value separator is a semicolon
- 1. Create a “fuel.csv” file formatted as follows (one row for each fill-up):
- date, format YYYYMMDD
- amount paid
- amount of fuel purchased
- current mileage odometer value (if applicable)
- mileage odometer value at previous fill-up (if applicable)
- current hour odometer value for left engine (if applicable)
- hour odometer value at previous fill-up for left engine (if applicable)
- current hour odometer value for right engine (if applicable)
- hour odometer value at previous fill-up for right engine (if applicable)
- partial fill-up flag (empty, or “yes”)
- comment (optional)
You only have to populate the fields relevant to the motorization you selected for the vehicle when you created it.
The file must not contain any header blocks, characters with accents or quotation marks.
Examples of valid CSV files for both types (2 fill-ups in May 2012 for a boat with hour odometer):Separated by semicolons:
20120501;61,25;42,5;;;1234;1220 ;;;;Shell gas station
20120524;75,53;52,27;;;1245;1234 ;;;yes;Separated by commas:
20120501,61.25,42.5,,,1234,1220,,,,Shell gas station
20120524,75.53,52.27,,,1245,1234,,,yes,Note: this format is also used by the app when you export a CSV file (Analysis > Data export > CSV File).
To complete the procedure, connect your device to iTunes.
2. In iTunes, select your target device (below Devices), and click on the “Apps” button.
3. Below File Sharing, in the app list on the left, select Boat Manager.
4. Click on ‘Add’ in the list of shared documents.
5. Select the “fuel.csv” file you created in step 1 (see above).
6. The file is transferred to your device.
7. On your target device, select Settings, Database Management.
8. Select “Import Fuel CSV File”.
9. Select the vehicle and confirm the import by clicking on the “import file” button.
10. If your file contains any errors, they will be reported and your file won’t be imported. Correct your file and start importing it again.
Fill-up data have to be entered chronologically, so it is important that no newer information is entered before you try to enter older data. If this is the case, you first have to delete these data.
Before entering the information about the first fill-up into the history, modify the current vehicle odometer values (time and/or mileage) so that they match the values at the time of that particular refill (see previous question).
You can then enter all the history of your vehicle fill-ups, always making sure that this is done in chronological order.
2) Automatically (import of a CSV file):
Your CSV file can be of two types:
![]() How is the carbon footprint calculated?
How is the carbon footprint calculated?
The mass of CO2 emitted by your vehicle is essentially linked to its fuel consumption (and therefore to fill-ups). The equivalence used in the app is that a liter of consumed fuel equals the emission of 2.3 kg of CO2 (gasoline) and 2.7 kg of CO2 (fuel oil / diesel).
3) Expenditure (other than fuel):
![]() How can I add an expense not related to fuel fill-ups (maintenance, equipment, insurance, etc.)?
How can I add an expense not related to fuel fill-ups (maintenance, equipment, insurance, etc.)?
Select the vehicle under the Motors tab, then hit the “Other expenses” label, or select the “Expenses list” icon in the vehicle list.
The expenses list is then displayed. Hit the “+” button, then select the “Category” button for this cost line, input the amount and validate with “OK”.
You can add a negative cost to an existing expense category (in case of a refund on a maintenance operation for example), which will be subtracted from the global amount of that category.
![]() How can I add a monthly expense?
How can I add a monthly expense?
This section allows you to add recurrent expenses (for example, your insurance fees), which will automatically be triggered each month during a predefined time span.
Select the vehicle under the Motors tab, then hit the “Recurrent monthly expenses” label, which will display the related list.
Hit the “+” button and enter the following information:
- Beginning and end months
- Name of recurrent expense
- Monthly amount
![]() How can I add an expense category?
How can I add an expense category?
The application comes with some of the most conventional expense categories (maintenance, equipment, insurance, etc.). You can add your own categories to this list when you input an expense.
In the category list (when entering an expense or from the Settings tab), hit the “+” button and type the name of the new category. It will then be available in the category list when entering an expense.
![]() How can I add the expense history?
How can I add the expense history?
Your CSV file can be of two types:
- USA/UK CSV file: the decimal separator is a period/full stop and the value separator is a comma
- Non imperial countries CSV: the decimal separator is a comma and the value separator is a semicolon
1. Create a “costs.csv” file formatted as follows (one row for each fill-up):
- date, format YYYYMMDD
- category name
- amount paid
- current odometer value (optional)
- comment (optional)
The file must not contain any header blocks, characters with accents or quotation marks.
Examples of valid CSV files for both types (2 fill-ups in May 2012 for a boat with hour odometer):
Separated by semicolons:
20120624;equipment;175,53 ;1240;;
Separated by commas:
20120624,equipment,175.53,1240,,
Note: this format is also used by the app when you export a CSV file (Analysis > Data export > CSV File).
To complete the procedure, connect your device to iTunes.
2. In iTunes, select your target device (below Devices), and click on the “Apps” button.
3. Below File Sharing, in the app list on the left, select Boat Manager.
4. Click on ‘Add’ in the list of shared documents.
5. Select the “costs.csv” file you created in step 1 (see above).
6. The file is transferred to your device.
7. On your target device, select Settings, Database Management.
8. Select “Import Cost CSV File”
9. Select the vehicle and confirm the import by clicking on the “import file” button
10. If your file contains any errors, they will be reported and your file won’t be imported. Correct your file and start importing it again.
4) Planned actions and expiry dates:
Planned actions allow you to schedule operations based on a due date or odometer value (time and/or mileage), for example, engine overhaul, installation of new equipment, etc.
Expiry dates enable you to create equipment lists (generally, safety-related items) that need to be replaced once their expiry date has been reached.
![]() How can I plan a new action?
How can I plan a new action?
Select the vehicle under the Motors tab, then hit the “Planned actions” label.
The list of planned actions is then displayed. Hit the “+” button. Enter the name of the action, as well as a few words of description if you so wish.
According to the action type you select, enter the due date or the odometer value (time or mileage) for which the action should be performed.
Once this deadline has been reached, the planned action will be considered as late, displayed in red and an iOS notification (alert) will be triggered.
Once the action has been performed, you can delete it to remove it from the list. Should you do so, you can then create a note to keep track of the related operation in the vehicle’s history.
![]() How can I add an expiry date?
How can I add an expiry date?
Select the vehicle under the Motors tab, then hit the “Expiry dates” label.
The list of expiry dates is then displayed. Hit the “+” button. Enter the name of the equipment, as well as a few words of description and a picture if you so wish.
Input its expiry date.
Once this deadline has been reached, the equipment will be displayed in red and an iOS notification (alert) will be triggered.
Once the equipment has been replaced, you can modify it with its new expiry date.
![]() How can I know which planned actions are late or which equipment has reached its expiry date?
How can I know which planned actions are late or which equipment has reached its expiry date?
According to their type, actions are considered late when:
- The due date specified for the action is before or the same as the current date
- The hour odometer value specified for the action is less than or equal to the current hour odometer value of the vehicle
- The mileage odometer value specified for the action is less than or equal to the current mileage odometer value of the vehicle
A piece of equipment is considered to have expired when the current date is after or the same as its expiry date.
If at least one planned action is late or an expiry date is reached:
- A red “!” icon is displayed in front of the concerned vehicle in the main list
- A red badge (indicating the number of overdue events) is displayed on the app icon and on the Motors tab
![]() How can I customize iOS reminders for planned actions and expiry dates?
How can I customize iOS reminders for planned actions and expiry dates?
Under the Settings tab, select the Settings button, then hit the “Badges and notifications” label.
This section allows you to:
- Activate or deactivate the red badge (number of overdue events (late actions or expiry dates reached)
- Customize the iOS reminders (no notification, same day, one week before, one month before)
5) The Log:
The log allows you to register events and places in order to keep track of major events in the life of your vehicle.
![]() How can I add a log entry?
How can I add a log entry?
Select the vehicle under the Motors tab, then enter the “Log” section.
The log entry list is displayed. Hit the “+” button, and enter the following information:
- Date
- Title
- Description (you can indicate the name of passengers or any other important information)
- Place, by tapping on the “Location” label. You can then select the current GPS location or select the place you want on the map. Hit the “Tag location” to save it
- Odometer value (time or mileage, optional)
- Picture (optional)
![]() How can I visualize my log entries on a map?
How can I visualize my log entries on a map?
Select the vehicle under the Motors tab, then enter the “Log” section.
Tap on the “Map” button at the bottom left.
The different log entries are displayed on a map as blue icons.
You can tap on each one to display its detailed information.
Use the “Film roll” icon to display all the pictures related to your log entries.
6) Check lists:
They enable you to keep track of the series of elements you need to check, in order to avoid forgetting them when applying a given procedure.
For example, you can create a “Pre-Departure Check List” to ensure you perform every necessary control on your boat before going to sea.
![]() How can I create a new list?
How can I create a new list?
Select the vehicle under the Motors tab, then hit the “List” label.
The existing check lists are displayed. Hit the “+” button before entering the name of your new list.
Then simply tap on the “+” button of the list to add new elements. For each element, you need to enter the following information:
- Element name
- Description (optional)
- Picture (optional)
![]() How can I export a list?
How can I export a list?
Select the vehicle under the Motors tab, then hit the “List” label.
The existing check lists are displayed. Select the list you wish to export and hit the “PDF” button.
![]() How can I run a list?
How can I run a list?
Select the vehicle under the Motors tab, then hit the “List” label.
The existing check lists are displayed. Select the list you wish to run and hit the “à” button in the tool bar at the bottom of the screen.
The list of elements is then displayed.
Simply tap on the checkboxes on the right to indicate whether the elements have been run. A counter at the top indicates how many elements have been run, and the total number.
You can reset the list (empty all checkboxes) by using the “Reset” button at the top right.
7) Notes:
Notes are a practical way of keeping track of any type of information that does not belong to the other sections.
You can use them to create the history of your vehicle, for example.
![]() How can I add a new note?
How can I add a new note?
Select the vehicle under the Motors tab, then hit the “Notes” label.
The existing notes are displayed in chronological order. Hit the “+” button before entering the following information:
- Title
- Date
- Description (optional)
- Picture (optional)
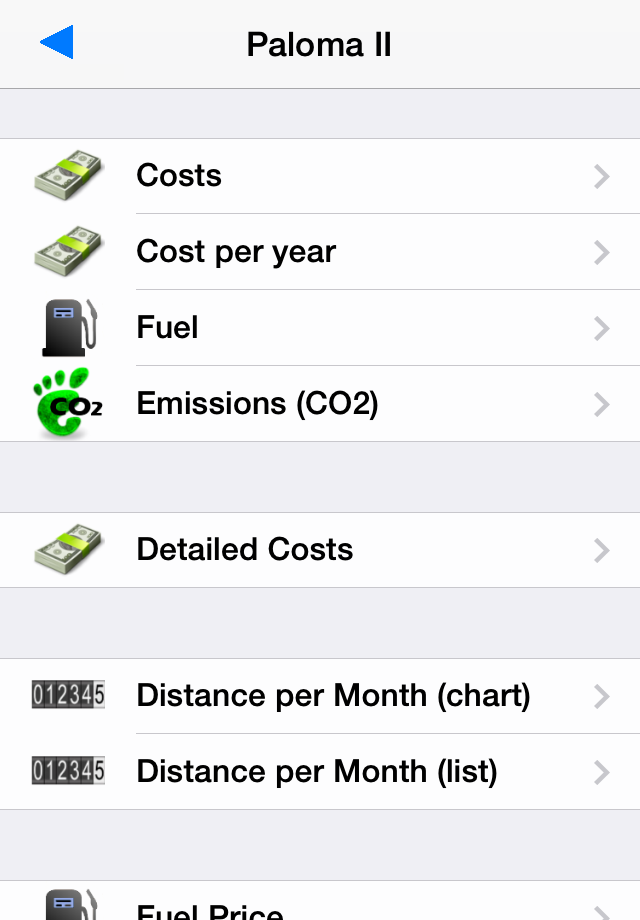
8) The Analysis section:
This section features all the functionalities allowing you to retrieve the calculations performed by the application based on the data you enter (fill-ups and expenses) for the selected vehicle:
- Fuel consumption mean and statistics
- Change in fuel price
- Change in expenses and their breakdown
- Carbon footprint
- CSV exports for fill-ups and expenses
- PDF report
9) Contacts:
The Contacts tab enables you to store information about your service providers or other contacts related to the vehicles you manage in the app.
For example: service centers, shops, insurance companies, etc.
You can specify various information for each contact, including a name, an address, a telephone number, an e-mail address and a category.
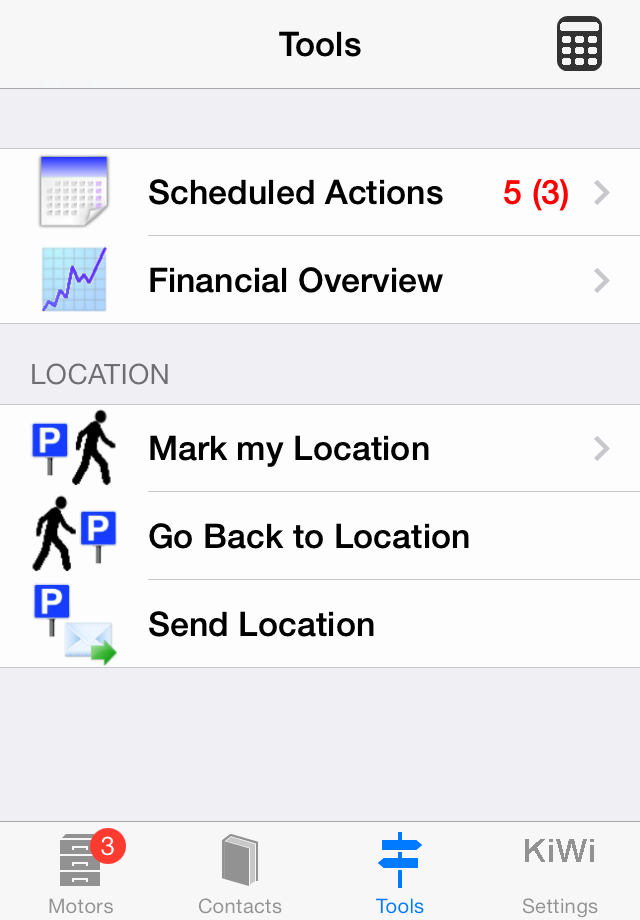
10) Tools:
The Tools tab includes three main functionalities:
- List of planned actions and expiry dates for all your vehicles
- Financial overview of all expenses, for all your vehicles
- Simple GPS tool allowing you to memorize a location and be able to go back there
Saving and transferring data to another device:
![]() How can I save the application data?
How can I save the application data?
Application data backup is a built-in feature of your iPhone-iPad and iTunes, as long as you regularly synchronize your device with iTunes on your PC or Mac.
At the beginning of the syncing process, iTunes saves the following data from your device:
Contacts and Contact favorites
App Store Application data
Application settings, preferences and data
Music, videos, photos, etc.
When you change your device, or even with your current device, you are able to restore that backup with iTunes. You will thus be able to retrieve all the data and content saved during the last syncing.
For more information about backup saving and restoring, please visit:
http://support.apple.com/kb/HT1766?viewlocale=us_US
You can also use the “iTunes Database export” feature (see below) to run an individual backup of your application data. Be careful to properly save the “Database_Export.db” file on your PC or Mac.
You’ll then be able to restore your data with the “iTunes: Import a database” functionality later.
![]() iTunes: How can I transfer my database to another device?
iTunes: How can I transfer my database to another device?
If you want to transfer your data from your iPhone to another one (or an iPad or an iPod Touch), follow this process closely:
A) From your source device (device A):
select Settings, Database Management
select “iTunes File Sharing / Export Database”
connect your source device to your computer
in iTunes, select the device (below Devices), and click on the “Apps” button.
below “File Sharing” from the list on the left, select the application
from the list on the right, select the “Database_Export.db” file and click on “Save to”.
in the window that appears, select the destination where you want to save the file, and click Choose.
B) From your target device (device B):
connect your device to your computer
in iTunes, select your target device (below Devices), and click the “Apps” button.
Below File Sharing, in the list on the left, select the application
Click on ‘Add’ in the list on the right
in the window that appears, select the the “Database_Export.db” file you saved in step A.6 (see above).
the file is transferred to your device.
on your target device, Settings, Database Management
select “iTunes File Sharing / Import Database”
Just confirm the import by clicking on “Yes” in order to replace the former database by the one just transferred.
Once finished, device B contains exactly the same data as device A.
Note 1: the Export feature can be used to back up your app database: in this case, select the ‘Database_Export.db’ file in iTunes, and click on ‘Save to’ to back it up on the chosen support (hard disk, USB storage, etc.).
Note 2: another way to back up your device is to Sync it with iTunes.
![]() iCloud: How can I transfer my application database to another device?
iCloud: How can I transfer my application database to another device?
Running iOS 5 or higher with a valid iCloud account, you can export your application database from your device to another device (iPhone, iPad or iPod touch) using the same iCloud account.
A) From your source device (device A):
select Settings, Database Management, Import Export
select “iCloud - Export Database”
B) From your target device (device B):
select Settings, Database Management, Import Export
select “iCloud - Import Database”. Check that the date and time correspond to the file you exported from device A.
just confirm the import by clicking on “Yes” in order to replace the former database of device B by the one just transferred from device A.
Once finished, device B contains exactly the same app data as device A.
Note 1: iCloud sync may take several minutes to complete, especially when data size is large and Internet connection, slow.
Note 2: if you have just installed and launched the app on device B, you are advised to wait a few minutes for the app to sync with iCloud, before exporting your data from device A.