


| Apps | About us | Contact |
|
|
|
|
| Lite version available |
![]() Create, schedule and run your checklists with the simple and handy features of Check List Pro.
Create, schedule and run your checklists with the simple and handy features of Check List Pro.
Check List PRO will help you organize and follow the performance of repetitive tasks such as works, maintenance operations, business, studies or projects, and prevent you from forgetting them, especially those which should be performed with care. Check List Pro will enable you to manage your to-do lists precisely, by assigning them to categories and defining priorities for them. |
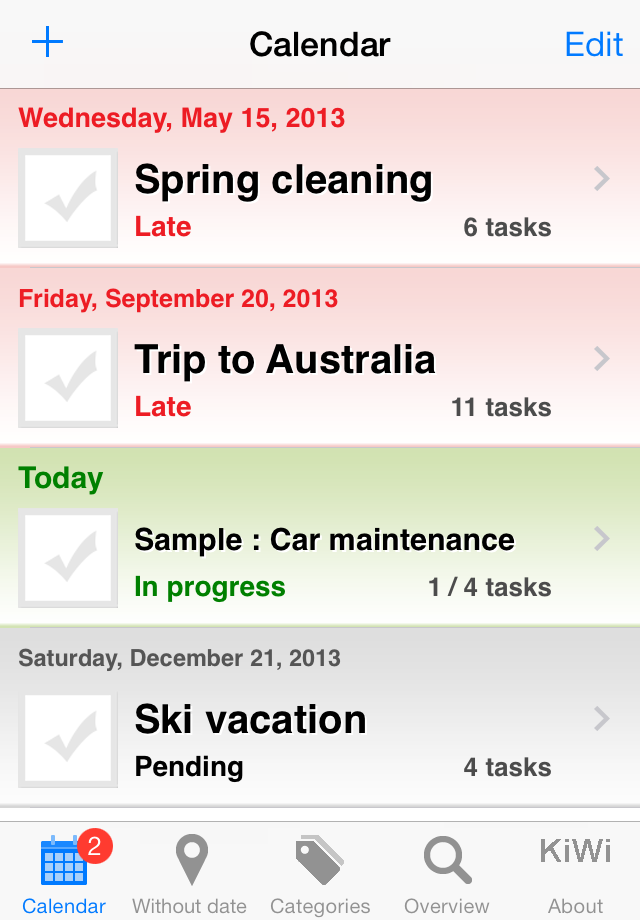
You will find your checklists organized in an effective and structured way under three separate tabs: “Calendar” (for the checklists that must be run at a precise date), “Without (fixed) date” (for those which can be run at any moment) “Categories” (for a categorized display). The application enables you to create tasks and sub-tasks, thus allowing you to create secondary levels within checklists. |
For productivity purposes, Check List PRO also features a duplication tool which will help you copy frequently-used checklists. You can also use Airprint to get a hard copy of your checklists, or send them directly by e-mail. Universal application with full resolution support for iPad. |
Help & FAQ
![]() What is a CheckList?
What is a CheckList?
A checklist has two different statuses: either stopped or started.
The life cycle of a checklist is as follows.
Defining the checklist:
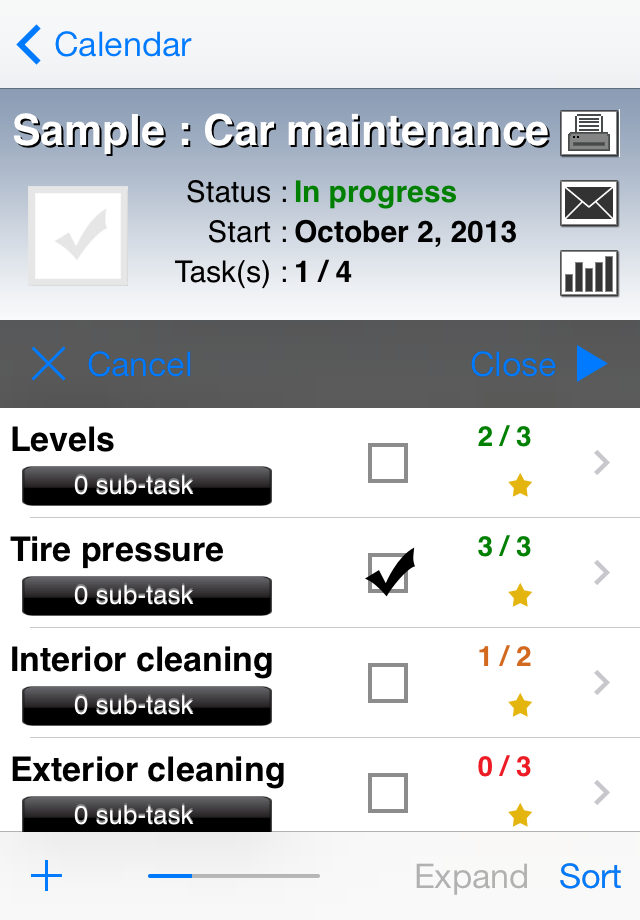
create the checklist using the “+” button in the main list. For example: “vehicle maintenance”, with or without choosing a planned performance date.
add tasks using the “+” button on the checklist detailed view. For example, “cleaning”, “checking levels” and “filling up the tank”.
Running the checklist:
hit the “start” button when the time has come to perform the different tasks in the checklist
each time a task is performed, hit its label to validate its completion
hit the “close” button to finish the checklist (you don’t need to have performed all the tasks in order to close it)
you can then schedule the next date on which that checklist will be run. For example: “car maintenance” next week.
![]() What do the background color and status label correspond to?
What do the background color and status label correspond to?
A checklist changes its status and color several times during its lifecycle:
“Pending” and gray means the checklist hasn't been started yet or is currently stopped
“Late” and red means the checklist is late with relation to the scheduled date
“Ongoing” and green means the checklist is currently being run
![]() What is the difference between a “Planned” and a “Non-planned” list?
What is the difference between a “Planned” and a “Non-planned” list?
The application can manage two different types of lists. The ones with a fixed performance date are called “Planned”, others without such deadlines are called “Non-planned”.
Planned checklists are displayed under the “Calendar” tab by order of deadline, whereas non-planned checklists are displayed under the “Without date” tab by order of status (“Ongoing”, “Late”, “Pending”).
You can switch between these two types after the creation of the checklist. Simply open the tab where the list is displayed (“Calendar” or “Without date”) then hit the “Edit” button at the top right of the screen. A blue button with a white chevron appears to the right of the checklist names, tap it to open the Settings screen allowing you to input a deadline (or delete the one you previously entered).
Note: You cannot modify the deadline of a checklist which is being run. You first have to stop this operation before being able to do so.
![]() What does the badge displayed over the application icon mean?
What does the badge displayed over the application icon mean?
This badge indicates the number of planned checklists that are late with relation to their scheduled dates.
![]() What do the numbers displayed next to each task stand for?
What do the numbers displayed next to each task stand for?
These values indicate the number of times a given task has been validated and scheduled.
This gives information about the effective completion rate, for example, “car cleaning”, 4 times out of 6. If the number is displayed in red, it means the task was performed less than one time out of 4 (rate < ¼); if it is in orange, the rate is < ½, and green is used for a rate > ½.
![]() How can I duplicate a checklist?
How can I duplicate a checklist?
On the checklist creation screen, you will notice a “+” icon next to the name field. If you hit this button, Check List PRO will allow you to select the checklist you wish to duplicate in the list of existing ones. Statistics related to the new checklist will of course be reset.
![]() How can I create sub-tasks?
How can I create sub-tasks?
You can create sub-tasks under an existing task by hitting the “0 sub-tasks” button located underneath the task name. You will then be able to add sub-tasks using the “+” button. These items count as checklist elements.
Saving and transferring data to another device:
![]() How can I save the application data?
How can I save the application data?
Application data backup is a built-in feature of your iPhone-iPad and iTunes, as long as you regularly synchronize your device with iTunes on your PC or Mac.
At the beginning of the syncing process, iTunes saves the following data from your device:
Contacts and Contact favorites
App Store Application data
Application settings, preferences and data
Music, videos, photos, etc.
When you change your device, or even with your current device, you are able to restore that backup with iTunes. You will thus be able to retrieve all the data and content saved during the last syncing.
For more information about backup saving and restoring, please visit:
http://support.apple.com/kb/HT1766?viewlocale=us_US
You can also use the “iTunes Database export” feature (see below) to run an individual backup of your application data. Be careful to properly save the “Database_Export.db” file on your PC or Mac.
![]() How do I transfer my data from the Lite version to the Full (paid) version?
How do I transfer my data from the Lite version to the Full (paid) version?
Simply use the iTunes Database Export/Import feature (the procedure is described in the following chapter), i.e. export the database from your Lite version, and import this database in the Full version
![]() iTunes: How can I transfer my database to another device?
iTunes: How can I transfer my database to another device?
This process will allow you to export your application database to another device.
A) From your source device (device A):
select About, Settings, Database Management
select “iTunes File Sharing / Export Database”
connect your source device to your computer
in iTunes, select the device (below Devices), and click on the “Apps” button.
below “File Sharing” from the list on the left, select the application
from the list on the right, select the “Database_Export.db” file and click on “Save to”.
in the window that appears, select the destination where you want to save the file, and click Choose.
B) From your target device (device B):
connect your device to your computer
in iTunes, select your target device (below Devices), and click the “Apps” button.
Below File Sharing, in the list on the left, select the application
Click on ‘Add’ in the list on the right
in the window that appears, select the the “Database_Export.db” file you saved in step A.6 (see above).
the file is transferred to your device.
on your target device, select About, Settings, Database Management
select “iTunes File Sharing / Import Database”
Just confirm the import by clicking on “Yes” in order to replace the former database by the one just transferred.
Once finished, device B contains exactly the same data as device A.
Note 1: the Export feature can be used to back up your app database: in this case, select the ‘Database_Export.db’ file in iTunes, and click on ‘Save to’ to back it up on the chosen support (hard disk, USB storage, etc.).
Note 2: another way to back up your device is to Sync it with iTunes.
Note 3: you can use this feature to transfer your data from the Lite version (export) to the Full version (import)
![]() iCloud: How can I transfer my application database to another device?
iCloud: How can I transfer my application database to another device?
Running iOS 5 or higher with a valid iCloud account, you can export your application database from your device to another device (iPhone, iPad or iPod touch) using the same iCloud account.
A) From your source device (device A):
select About, Settings, Database Management, Import Export
select “iCloud - Export Database”
B) From your target device (device B):
select About, Settings, Database Management, Import Export
select “iCloud - Import Database”. Check that the date and time correspond to the file you exported from device A.
just confirm the import by clicking on “Yes” in order to replace the former database of device B by the one just transferred from device A.
Once finished, device B contains exactly the same app data as device A.
Note 1: iCloud sync may take several minutes to complete, especially when data size is large and Internet connection, slow.
Note 2: if you have just installed and launched the app on device B, you are advised to wait a few minutes for the app to sync with iCloud, before exporting your data from device A.