


| Apps | About us | Contact |
|
|
![]() With “Easy Task Manager”, effortlessly manage your personal or business tasks for the following days and weeks.
With “Easy Task Manager”, effortlessly manage your personal or business tasks for the following days and weeks.
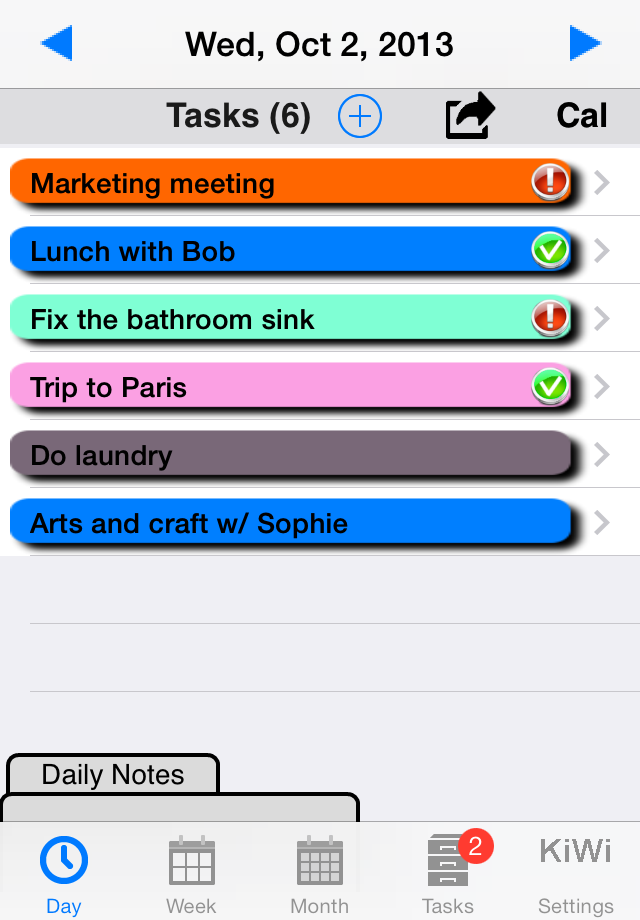 Simply define your tasks and easily gain access to an overview or detailed view of their status over time (completed, pending, ongoing, late) per day, per week or per month. Create your own color code and prioritize your tasks as you see fit, so that you can recognize them in the blink of an eye. Use the daily, weekly and monthly views to have a complete and precise vision of your tasks. Add or modify tasks and events with a single tap. Add daily notes, if you wish to comment your schedule. |
“Easy Task Manager” automatically postpones late tasks to the following days (procrastination) and alerts you when the deadline approaches, so you'll never be surprised by forgotten tasks anymore. Keep a history of completed tasks and easily retrieve them thanks to the built-in search engine. |
Should you need to, you are also able to define local notifications (alerts) for some of your tasks in order to be automatically reminded before they begin or end (the notification time can be customized for each task). “Easy Task Manager” is particularly suited to any person having to manage a number of tasks. Easily share your tasks between several devices (iPhone, iPad): the built-in import/export functionality of “Easy Task Manager” will allow you to transfer your data from one device to another. Freemium version, limited to 10 tasks. In-App Purchase allows you to create an unlimited number of tasks. |
Help & FAQ
![]() Is the application free of charge?
Is the application free of charge?
Downloading the application from the AppStore is free, but you will only be able to create 10 tasks. This will allow you to try the application and see if it fits your needs.
When creating the 11th task, you will be given the opportunity to make an In-App Purchase in order to remove this limit. If you decide to make this purchase, you will then be able to create as many tasks as you wish.
![]() How can I restore an application I purchased?
How can I restore an application I purchased?
If you lose your in-app purchase because the app was accidentally deleted (or install it on another device), or if you had to restore your device without a backup, the application won’t recognize your first in-app purchase but you are able to unlock it again for free.
On the app Settings view:
-
tap on the “Buy Full Version” / “Buy Now” buttons: during the process, you will get a message telling you that your previous in-app purchase has been restored, and that you won't be charged again
-
or if it is displayed, hit the “Restore in-app purchase” button
Important note: make sure that your device is connected to the iTunes account you used for the first in-app purchase.
Your in-app purchase will be restored, and you won't be charged again.
You can restore your in-app purchase on up to 5 different iOS devices, using the same iTunes account. More information about in-app purchases at:
https://support.apple.com/en-us/HT204530
![]() Possible errors when making in-app purchases:
Possible errors when making in-app purchases:
Error messages: “In-app purchases are currently disabled.” or “There was an error purchasing this item, please try again.”
Check the following items:
-
in-app purchases are enabled (iOS Settings, General, Restrictions, In-app purchase)
-
your Internet connection is OK
-
you are properly connected to your iTunes account (iOS Settings, Store, Apple ID), and your credit card details are valid.
Error message: “This item is currently being modified”
Check the following items:
you are properly connected to your iTunes account (iOS Settings, Store, Apple ID), and your credit card details are valid.
if there seems to be nothing wrong with your iTunes account, contact the Apple Express Lane at:
http://www.apple.com/support/contact/
![]() How can I create a new task?
How can I create a new task?
On the “Day” tab, hit the “+” button at the top left of the screen, or on the “Task” tab, hit the ‘+’ button at the top right of the screen.
Each task is characterized by:
start and end dates (the task will be valid during this time span, and automatically postponed if not completed by the end date)
-
a status: ongoing, late (but still ongoing, i.e. not pending), pending, completed
-
an alert, if you wish to be notified before the task begins or ends (you can choose between the start and end date in the application settings)
-
a priority level (high, medium, low)
![]() What is a task lifecycle?
What is a task lifecycle?
When you create a task, its status is “ongoing”.
When its end date is earlier than the current date, it changes to “late”.
It is possible to put a task on standby using the “pending” status: the task is on hold and is no longer displayed in the daily, weekly and monthly views.
Once completed, you have to change the task to the “completed” status (see next section).
![]() How can I terminate a task?
How can I terminate a task?
Once an ongoing task has been successfully completed, change its status to “completed” on the task’s detailed information screen.
By default, the closing date is set to the day you complete the task, but you can modify it via the “Completed date” label.
![]() How does the application postpone late tasks?
How does the application postpone late tasks?
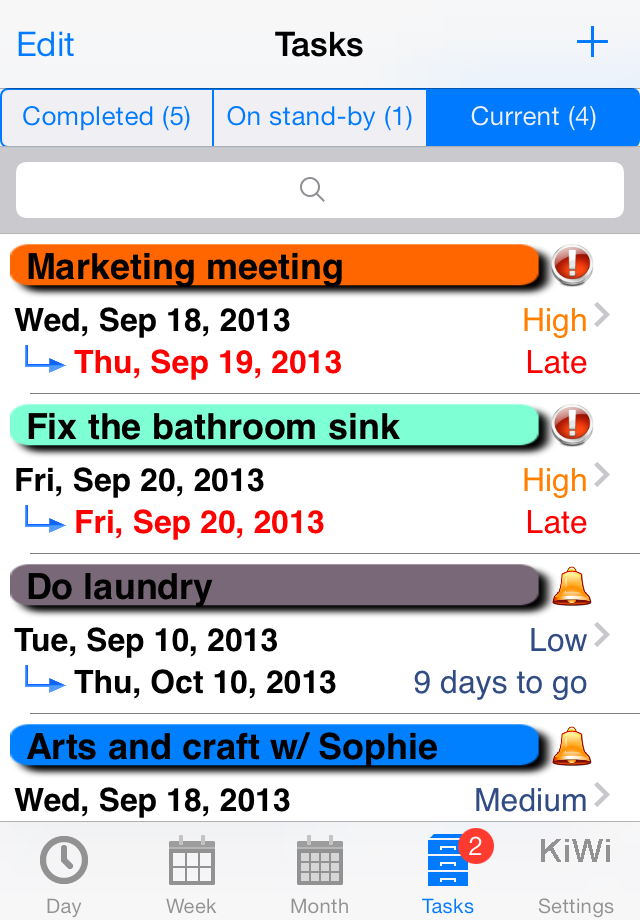
When the end date of one of your ongoing tasks is earlier than the current date, this task will be automatically postponed to the current day and flagged as “late”. A red icon with an exclamation mark is displayed to the right of the banner.
![]() How is the duration of a task calculated?
How is the duration of a task calculated?
The duration of a task corresponds to the number of days between its start and end dates for ongoing or pending tasks.
For completed tasks, the length is calculated using the completed date instead of the end date.
By default, the application calculates durations by taking each day of the week into account.
You are nonetheless able to include only weekdays (from Monday to Friday): simply go the application settings, under the “Tasks / Durations” category.
![]() How is the task list sorted?
How is the task list sorted?
By default, the task list is sorted by end date, in chronological order.
You can modify the criterion used for sorting in the application settings, under the “Task / Display order”. Other choices include the task name, the priority or the start date.
![]() How can I create a “day note”?
How can I create a “day note”?
The application enables you to associate a comment, which includes text and can include a picture, to every day. You will thus be able to remember a specific event or important information for that day.
On the “Day” view, hit the blue “Day note” label at the bottom right of the screen, then enter your comment and optionally attach a picture.
![]() How can I link a contact to a task?
How can I link a contact to a task?
Select your task, then the “name” section.
Tap the “Select Contact” button, then choose the contact in your address book. He/she is now linked to the task.
Once a contact is linked to a task, tap its button to:
remove the link from the contact
replace it with another contact
send him an e-mail (if the contact has an e-mail address)
call him (iPhone only, if the contact has a phone number)
When the task is completed, the app asks you if you want to send an e-mail to this contact.
Saving and transferring data to another device:
![]() How can I save the application data?
How can I save the application data?
Application data backup is a built-in feature of your iPhone-iPad and iTunes, as long as you regularly synchronize your device with iTunes on your PC or Mac.
At the beginning of the syncing process, iTunes saves the following data from your device:
Contacts and Contact favorites
App Store Application data
Application settings, preferences and data
Music, videos, photos, etc.
When you change your device, or even with your current device, you are able to restore that backup with iTunes. You will thus be able to retrieve all the data and content saved during the last syncing.
For more information about backup saving and restoring, please visit:
http://support.apple.com/kb/HT1766?viewlocale=us_US
You can also use the “iTunes Database export” feature (see below) to run an individual backup of your application data. Be careful to properly save the “Database_Export.db” file on your PC or Mac.
![]() iTunes: How can I transfer my database to another device?
iTunes: How can I transfer my database to another device?
This process will allow you to export your application database to another device.
A) From your source device (device A):
select About, Settings, Database Management
select “iTunes File Sharing / Export Database”
connect your source device to your computer
in iTunes, select the device (below Devices), and click on the “Apps” button.
below “File Sharing” from the list on the left, select the application
from the list on the right, select the “Database_Export.db” file and click on “Save to”.
in the window that appears, select the destination where you want to save the file, and click Choose.
B) From your target device (device B):
connect your device to your computer
in iTunes, select your target device (below Devices), and click the “Apps” button.
Below File Sharing, in the list on the left, select the application
Click on ‘Add’ in the list on the right
in the window that appears, select the the “Database_Export.db” file you saved in step A.6 (see above).
the file is transferred to your device.
on your target device, select About, Settings, Database Management
select “iTunes File Sharing / Import Database”
Just confirm the import by clicking on “Yes” in order to replace the former database by the one just transferred.
Once finished, device B contains exactly the same data as device A.
Note 1: the Export feature can be used to back up your app database: in this case, select the ‘Database_Export.db’ file in iTunes, and click on ‘Save to’ to back it up on the chosen support (hard disk, USB storage, etc.).
Note 2: another way to back up your device is to Sync it with iTunes.
![]() iCloud: How can I transfer my application database to another device?
iCloud: How can I transfer my application database to another device?
Running iOS 5 or higher with a valid iCloud account, you can export your application database from your device to another device (iPhone, iPad or iPod touch) using the same iCloud account.
A) From your source device (device A):
select About, Settings, Database Management, Import Export
select “iCloud - Export Database”
B) From your target device (device B):
select About, Settings, Database Management, Import Export
select “iCloud - Import Database”. Check that the date and time correspond to the file you exported from device A.
just confirm the import by clicking on “Yes” in order to replace the former database of device B by the one just transferred from device A.
Once finished, device B contains exactly the same app data as device A.
Note 1: iCloud sync may take several minutes to complete, especially when data size is large and Internet connection, slow.
Note 2: if you have just installed and launched the app on device B, you are advised to wait a few minutes for the app to sync with iCloud, before exporting your data from device A.